How To Make an IoT Device
Send and receive data between smartphones and Arduino

prev swe @hometap & honors CS + Econ @northeastern , worked part time @hfaresearch | built @resmeai
Imagine being able to communicate with any device from anywhere in the world. You can control your TV, lights, washing machine, dishwasher, toaster, coffee machine, anything you want, just for a few bucks.
You can do it with Arduino.
I have a lot of these lying around in my room, ready to automate another device of mine. In my other article, I covered how you can use Arduino as a switch to turn on or off any device. In this one, we are taking things further.
In this article, I will show you how you can send and receive data from smartphones to Arduino and vice versa. This would allow you to not only use your phone as a switch but also use it to send specific commands for operations and to get the state from Arduino.
I will use a WS2812B LED strip to send data from the phone for different colors and brightness, and I’ll get the state from ESP8266 for the same. You can use it for another project if you like.
Web Sockets
There are many ways you can set up a connection between a smartphone and an Arduino. You can use Bluetooth, online services, HTTP protocol, or web sockets.
I have compared these methods in one of my previous articles. How to Get an Arduino and Your Smartphone to Talk to Each Other A comparison of various Arduino communication methodsmedium.com
The conclusion was web sockets are a better way of transferring data, in the sense that the connection remains open until any one device disconnects. Unlike HTTP, web sockets need not make a new connection every time they want to send some data.
A good analogy would be a phone call. Until a party disconnects, both the parties can talk and communicate.
Web sockets are used where you need real-time data. For example, you do not want your screen to get refreshed every time you shoot in a game; that will cause latency and degrade the experience. In trading, you may want to know price changes as quickly as they happen, to find the right opportunity and make a profit. So for this project, web sockets is the way to go.
In cases where you don’t care about latency, need old data, or want data only once, HTTP is a better option.
How To Use Web Sockets in Arduino
Before we go ahead with the code, there are a few things you will need:
ESP8266-NodeMCU
Any device you want to control. I am using LED strips.
Smartphone
There are a few ways you can design an interface for the Android device. You can create either an Android app or a webpage hosted on the ESP8266. Whichever one you choose, apart from syntax differences, everything will be the same.
We will create an Android app using MIT App Inventor. It is a visual programming environment where you can create apps using drag-and-drop code. You can also use other platforms such as QT, Android studio, and others as per your convenience.
Here is a good read by Eileen King to learn more about MIT App Inventor: Creating your First App Your first app will use the algorithm when a button is pressed, play a sound.medium.com
 /WiFi Station Mode](https://cdn-images-1.medium.com/max/2000/1*LNs01q8orKnTc-M2k7998A.png) Image source: Last Minute Engineers /WiFi Station Mode
Image source: Last Minute Engineers /WiFi Station Mode
There are three extensions you will need to download in MIT App Inventor to make web sockets work.
**WebSocketCl1 **(To make a web socket connection)
**TaifunWiFi1 **(To connect to Wi-Fi and get information about it)
**KIO4_GetAllIp1 **(To get the IP addresses of all the devices connected to the same network — download the first attachment by Juan Antonio)
After you download them, do the following:
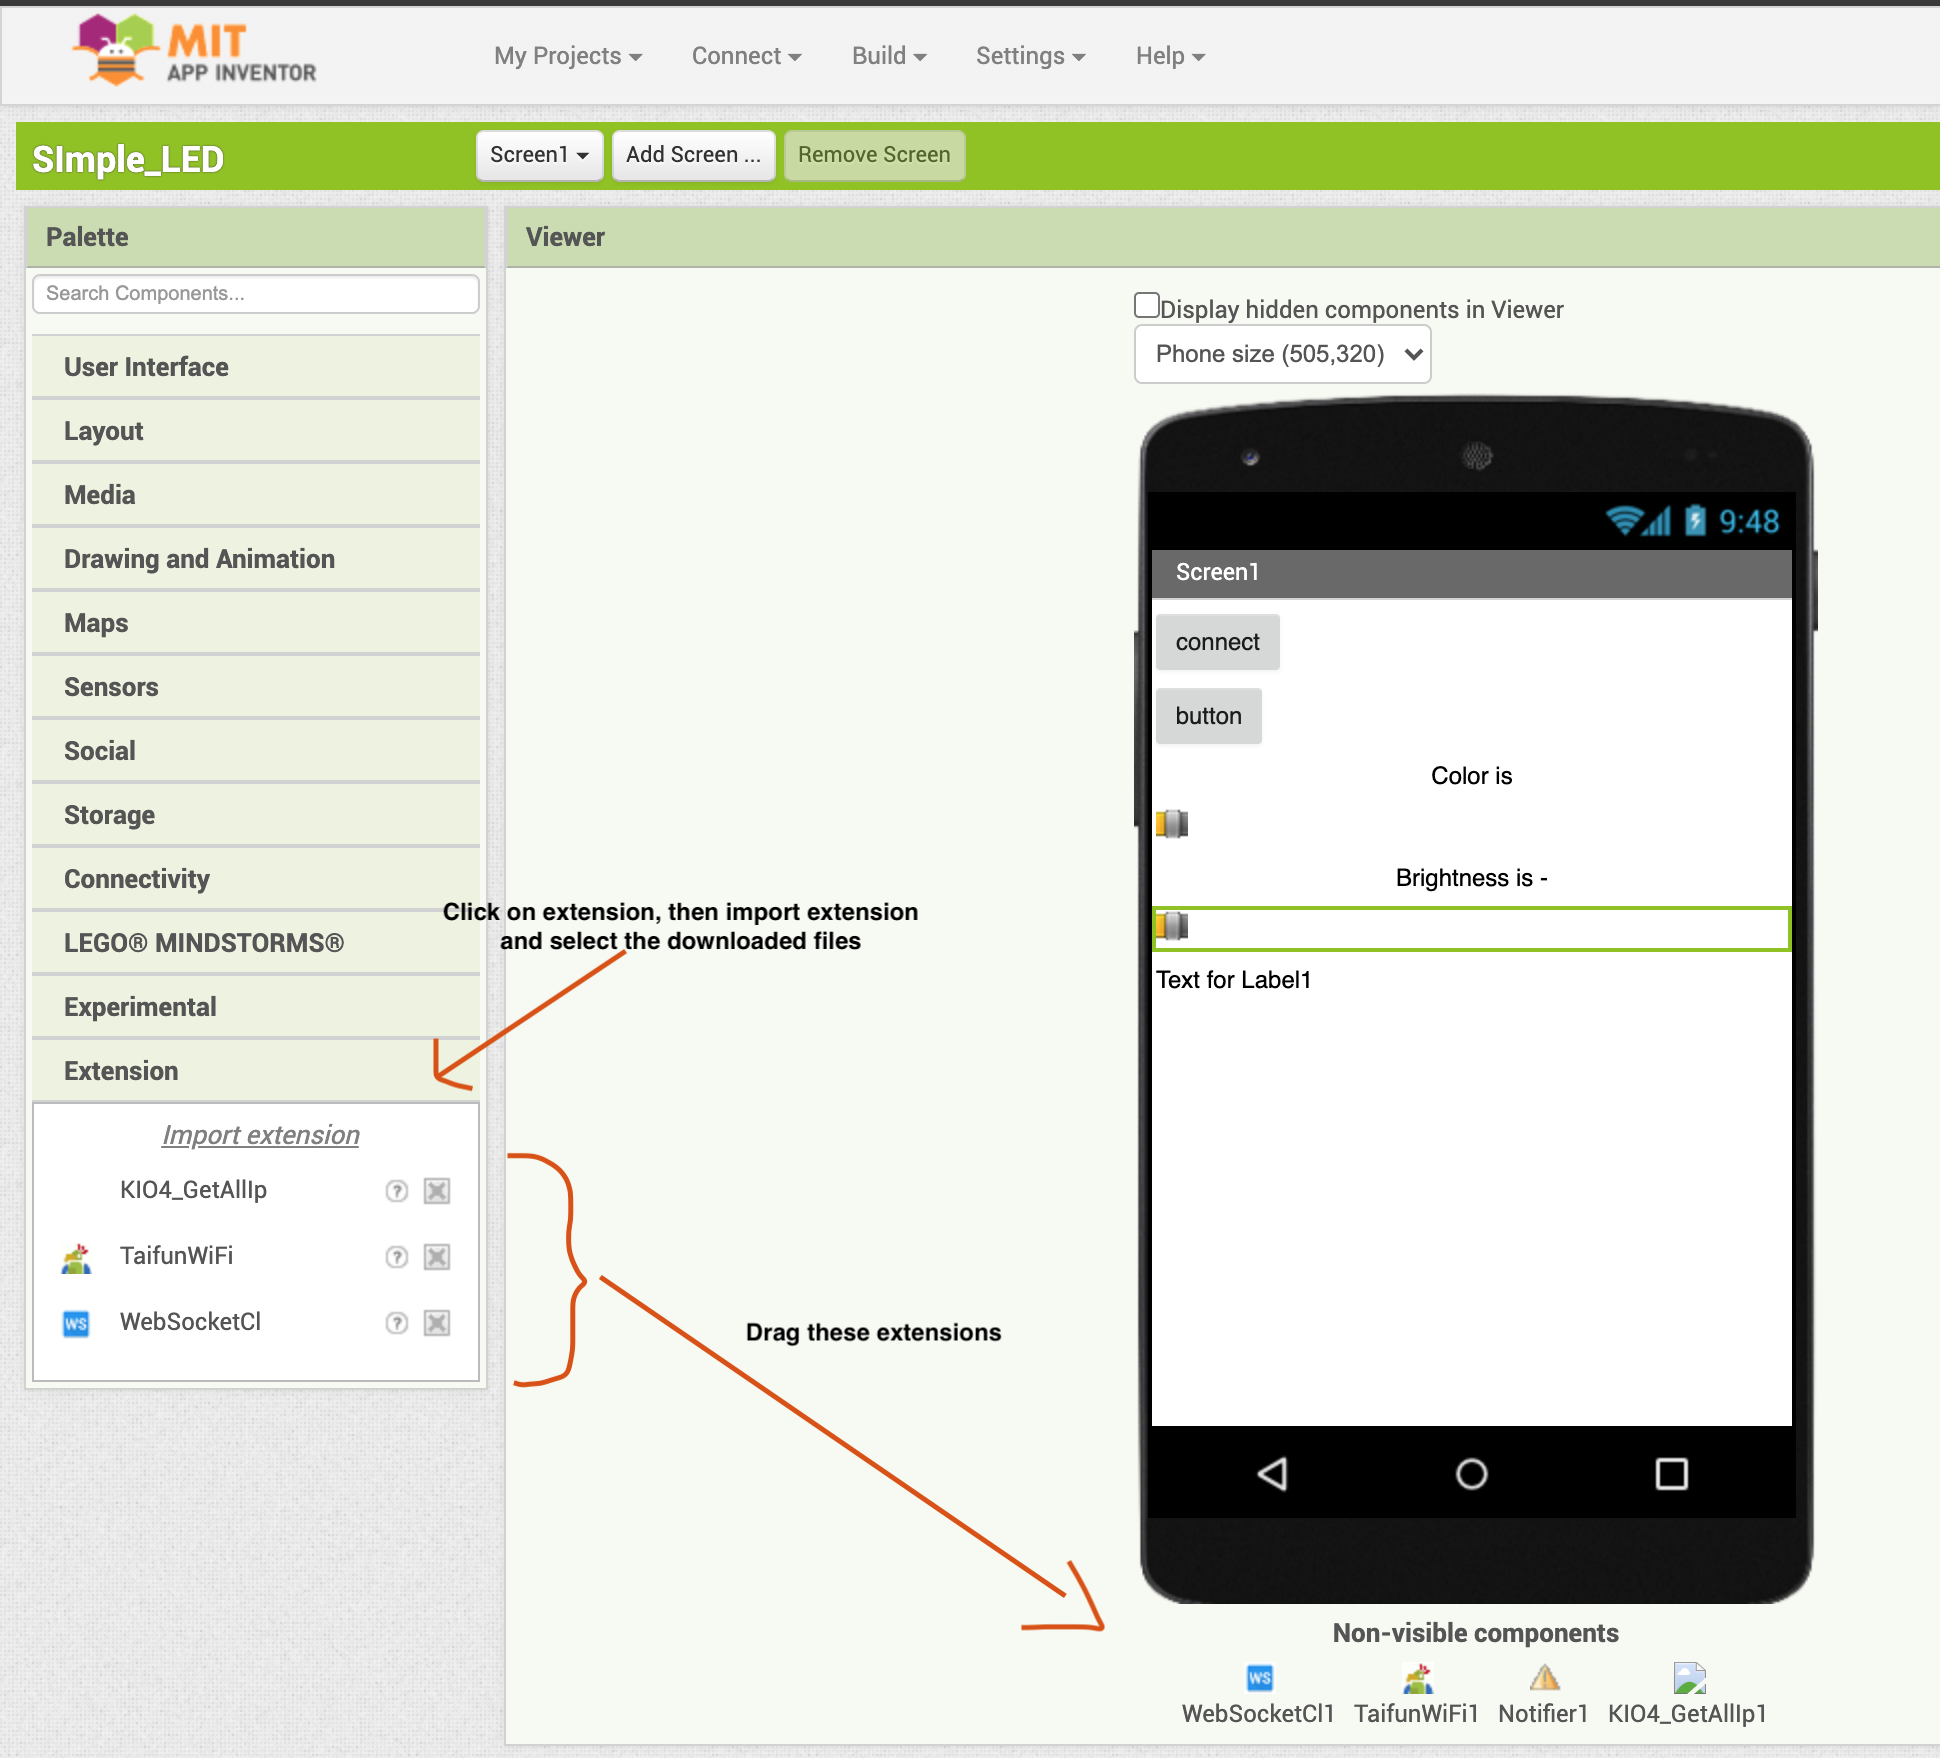 Darg the extensions to use them
I have created a simple UI using the drag-and-drop components, and you can improve the UI as per your needs. This is a straightforward part, so I’ll let you figure it out yourself.
MIT App Inventor Code
Click on the blocks button to program the app.
 Global variables to store values
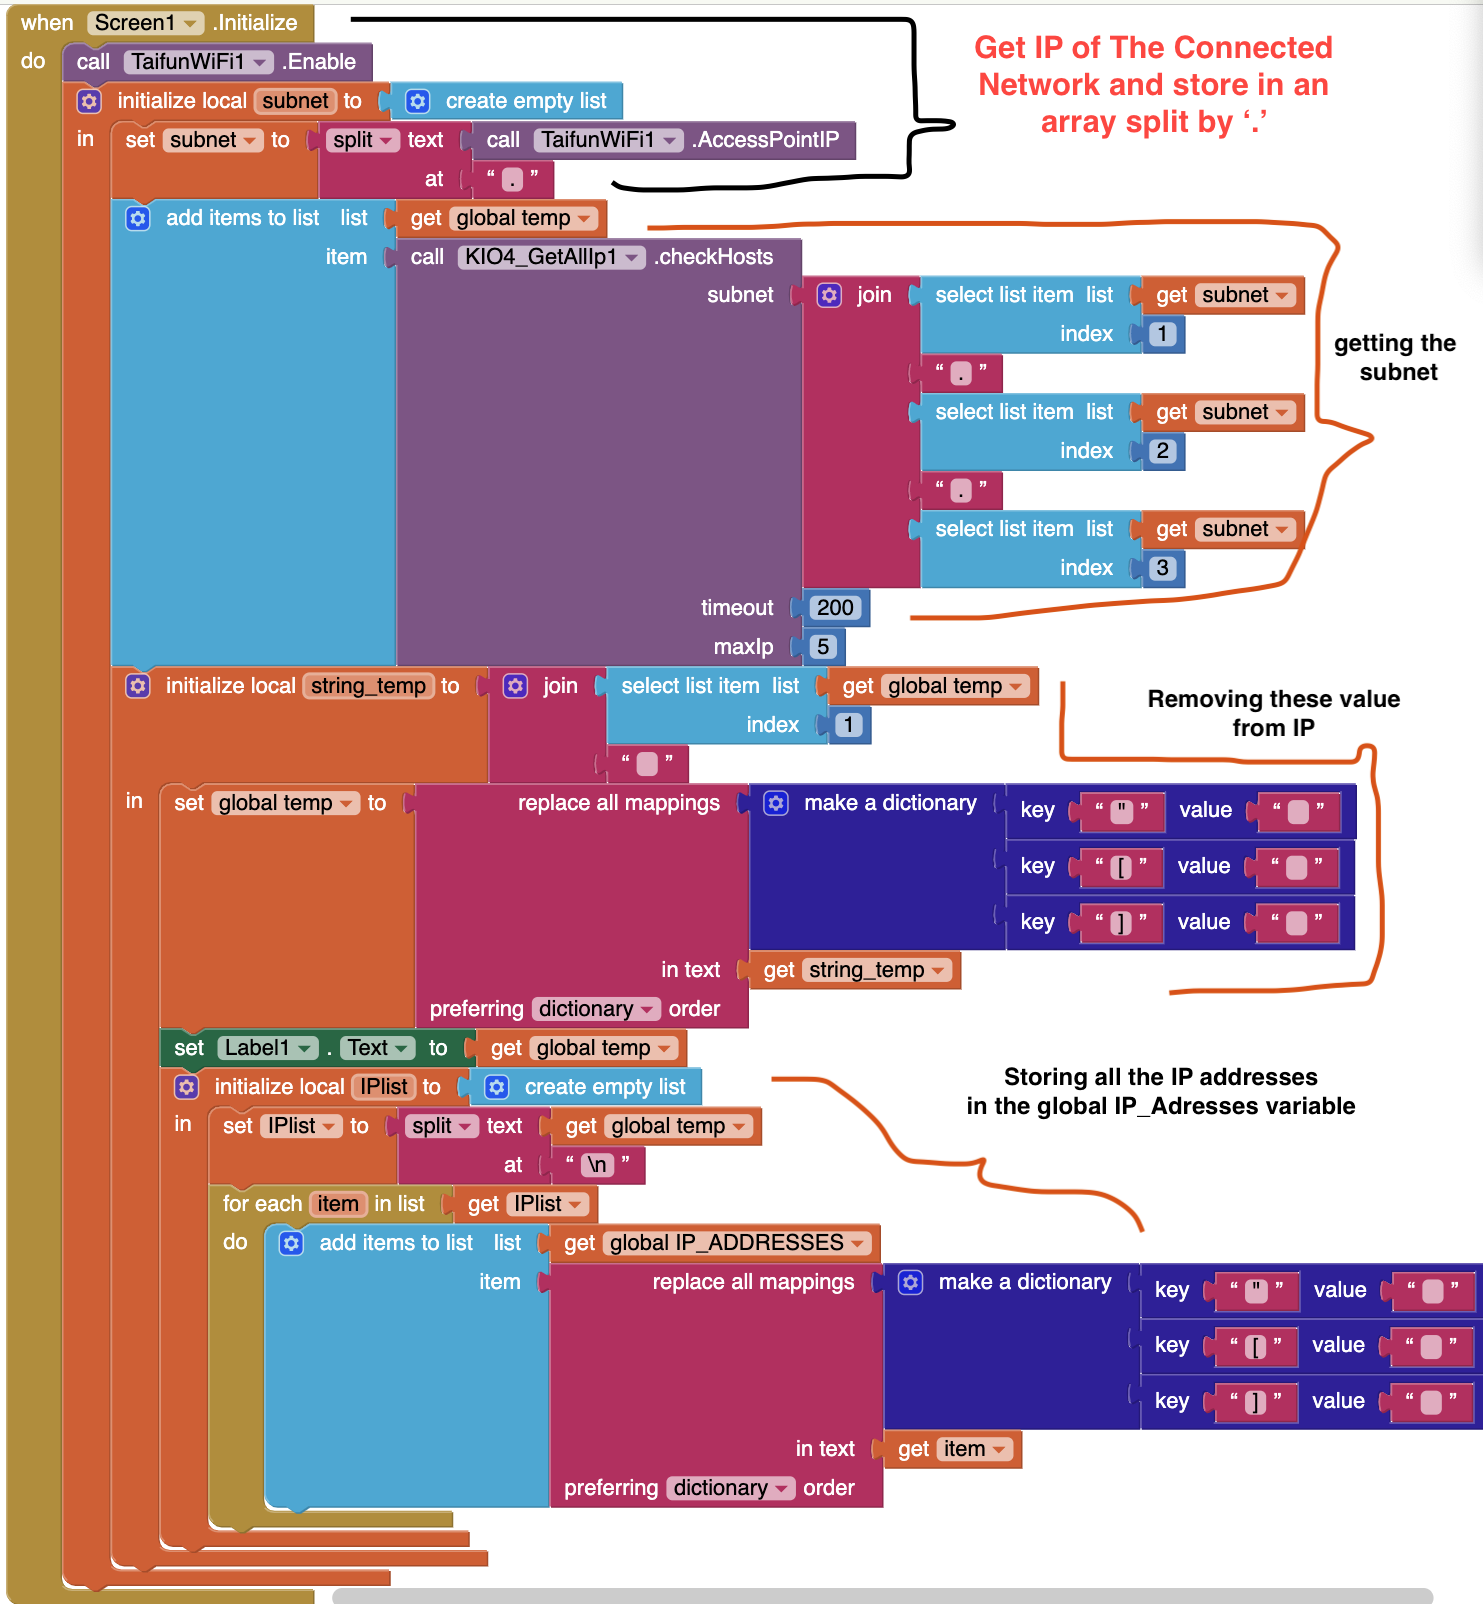 MIT App Inventor code to get the IP address of all the connected devices
Below is a detailed explanation of the above code.
When the app is opened, we collect the subnet of the network and store it in a variable. We need the subnet of the network because it is one parameter for the KIO4_GetAllIp1.checkHosts function which returns the IP addresses of all the connected devices.
With the IP addresses, we also collect some irrelevant data (“” and []) so we get rid of it using the replace all mappings function. Finally, we separate all the collected IP addresses and append them to a global array which can then be accessed by any function.
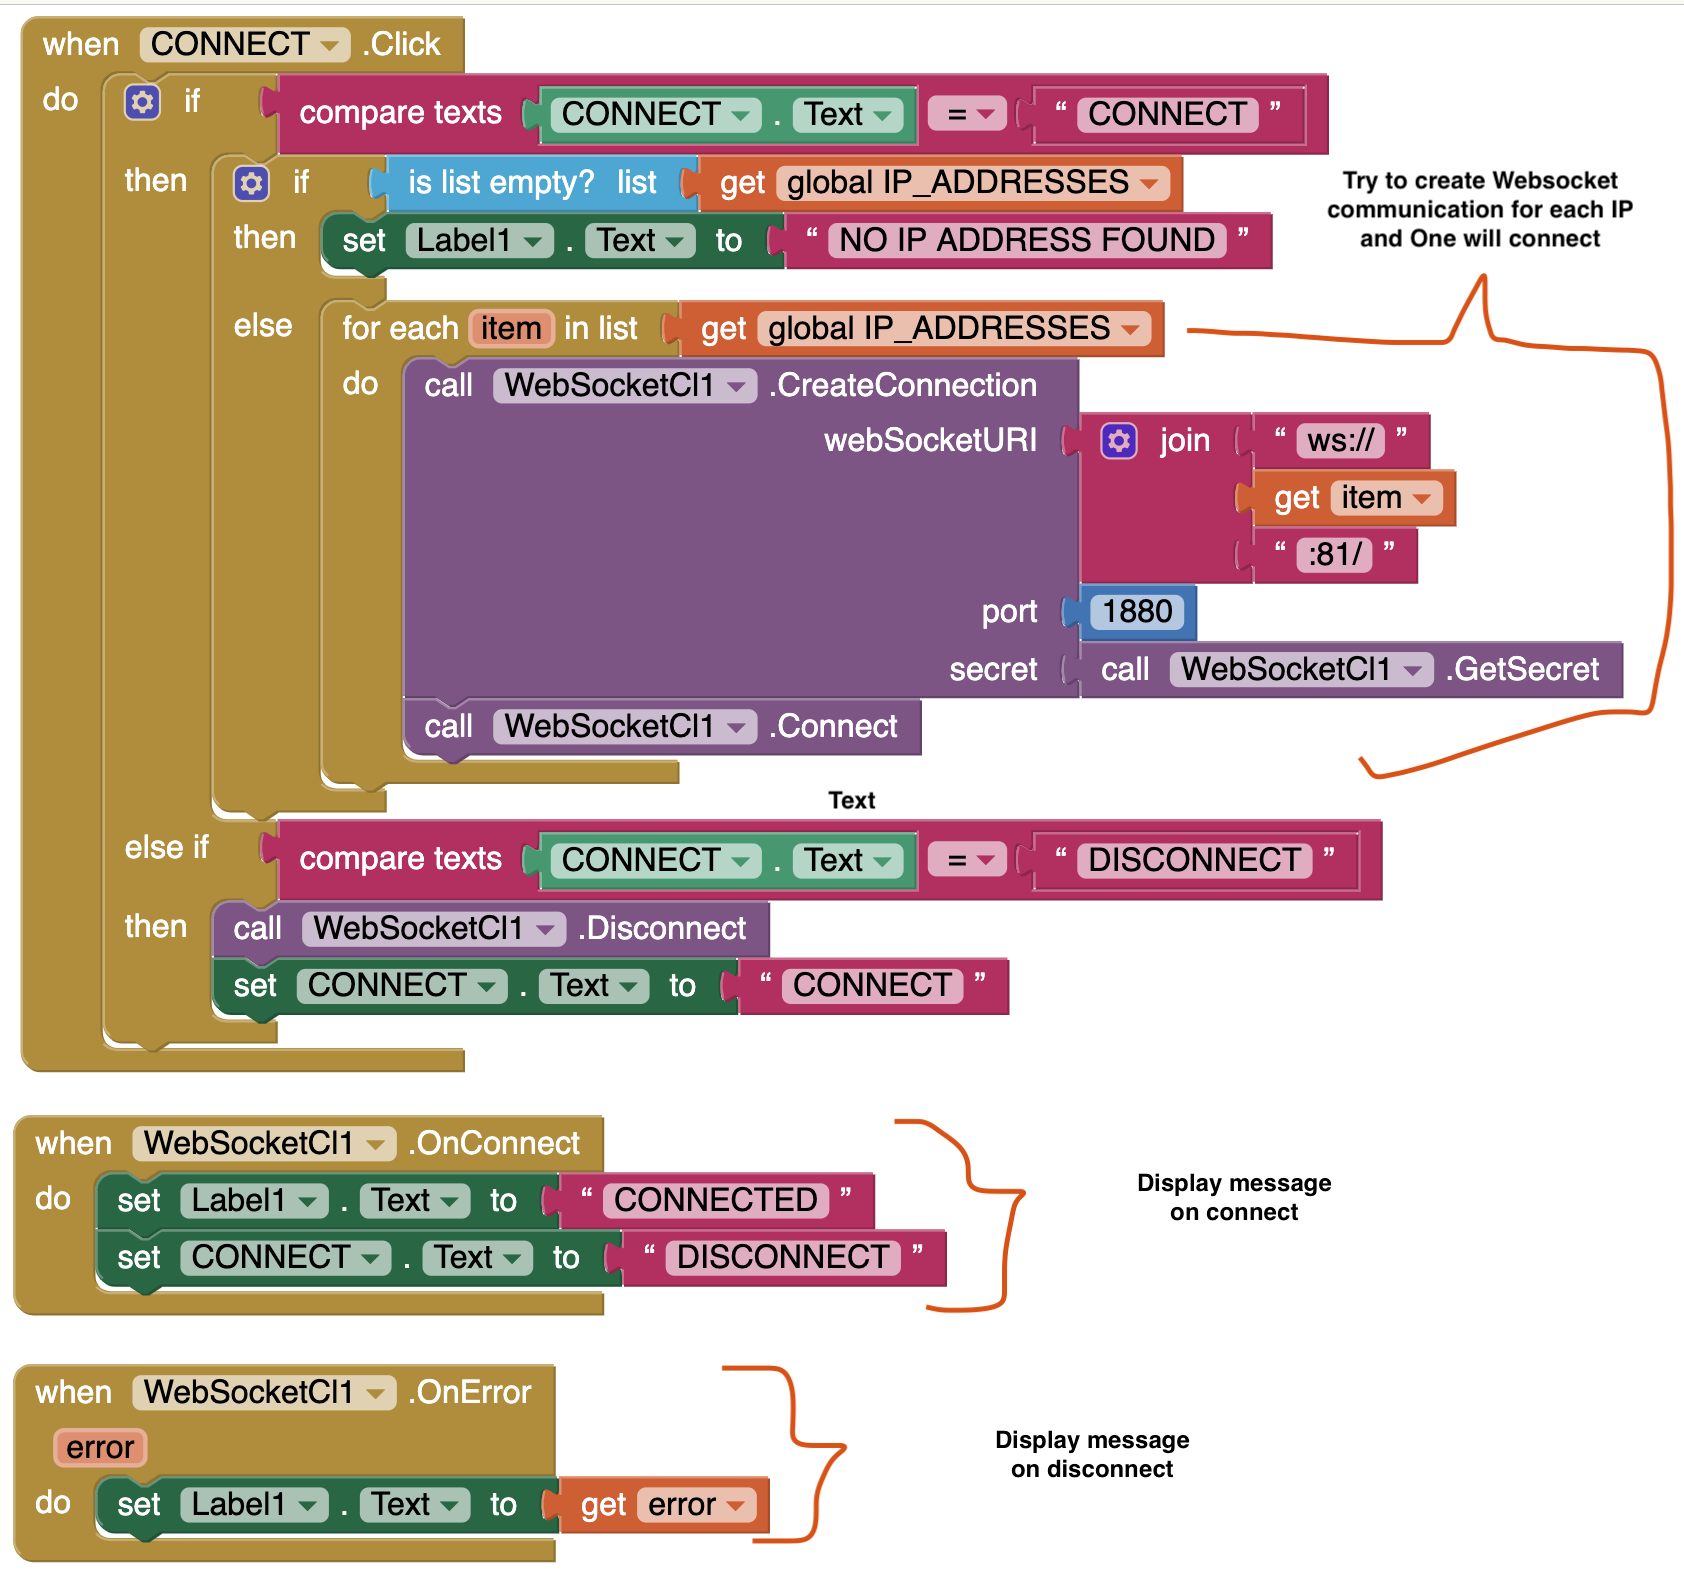 Function to make the connection with the phone
When the connect button is clicked, we call the above function. The connect button has two states: connect and disconnect. If the connection is not established, we try to connect to all the IP addresses using the WebSocketCl1.CreateConnection function because we do not know the IP address of the phone and we assume that only the phone is requesting a web socket connection.
There are other two functions,WebSocketCl1.OnConnect and WebSocketCl1.OnError. The former is called when a connection is made, and it renames the label to let the user know that connection has been made. The other function is called in case of an error.
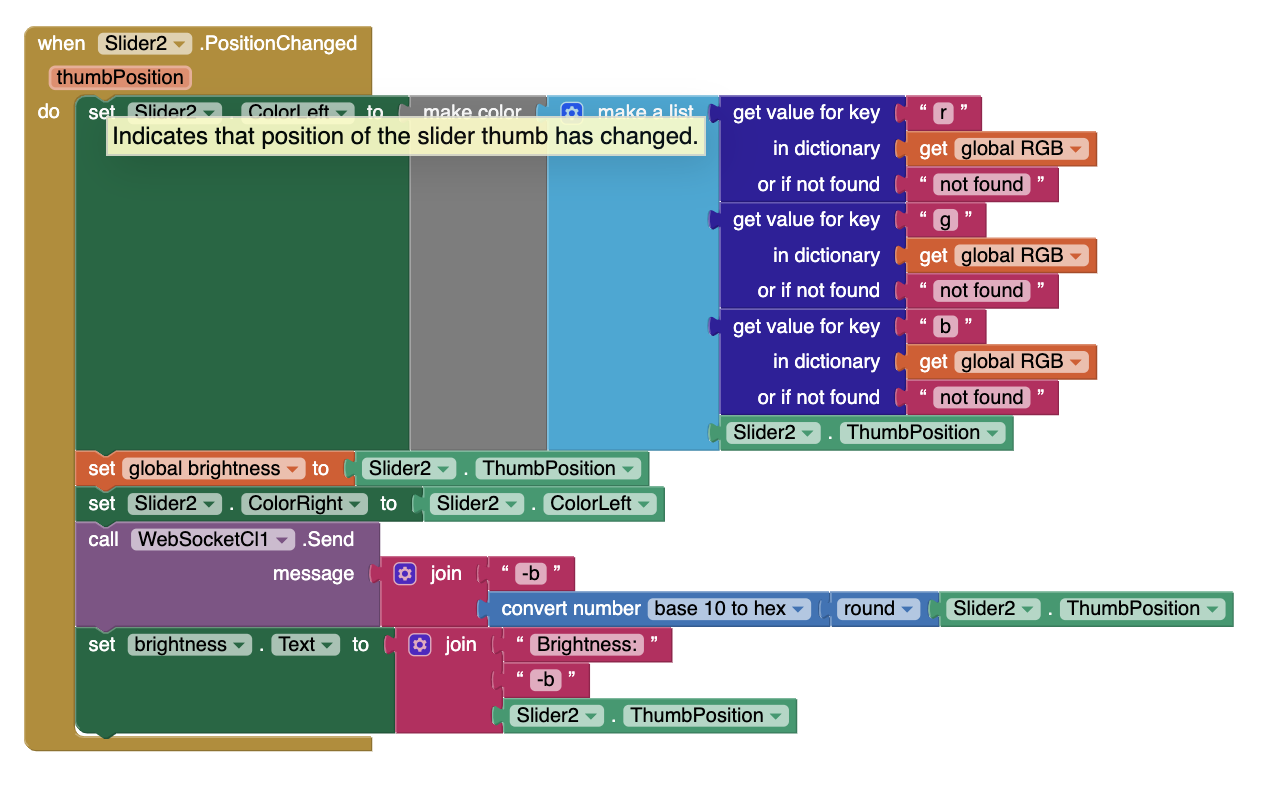 How to send a message from app to Arduino
The Slider2.PositionChanged function is used to set the brightness of the LED. The data is then sent to Arduino using the WebSocketCl1.Send function. It takes a string, so we concatenate the hexadecimal value with -b to indicate we are changing the brightness.
Note: The entire project is out-of-the-scope for this article, so I have left out the parts about RGB conversion and how we set the color. This is just to show you how data is sent. Below is the entire project. patni11/Arduino_LED This is a simple project I create to teach others how to connect Arduino to a smartphone using Wi-Fi and send data…github.com
To upload the code into an Android device, first download the MIT App Inventor app. Now go back to the code and click on the Build button, and then click on “provide QR code for APK file.” Now open the Android app and scan the QR code to get the download link for the APK file.
Arduino Code
This code is for my LED lights project, but it is perfect to explain how to use web sockets in Arduino.
Before we start, you must install the WebSocket Server library. First download the zip file using the link below and follow these instructions to install it. WebSocketsServer Library (Download It) a WebSocket Server and Client for Arduino based on RFC6455. Supported features of RFC6455 text frame binary frame…github.com
Include the WiFiClient.h andWebSocketsServer.h files. They will allow us to use Arduino as an access point. In simple terms, Arduino will act as Wi-Fi which our phone can connect to. Line 14 instantiates an object of WebSocketsServer class for port 81. On lines 15 and 16, we set the SSID and password for the Arduino access point.
In the setup() function, on lines 29 and 30, we turn on our access point, and on lines 35 and 36, look for any web socket connections. The main loop() of the program on line 39, which checks for any web socket requests, errors, or data.
The onWebSocketEvent() function is called in case of any request. It has four parameters: connection, type, payload, and length. The connection is the device it is connected to; type tells us what kind of message we have received such as connect request, disconnect request, data; and payload contains the actual message sent from the phone.
On line 46, we check what type of request we have received, and different operations take place based on that. I assume you are aware of how the switch case statement works. Now we just need to unpack the payload and call functions based on the received commands.
The rest of the code will change based on what you are trying to do. You just need to check for the type of request and make different functions to handle each case. The payload is a string, so you must send string data in such a way that it is easy to handle in Arduino, as I have done above.
Once you are done, you can upload the code to ESP-8266, and voila, the project is finished.